Market analysts spend most of their time analyzing marketing data across platforms. They focus on key performance indicators (KPIs) that can help enhance customer engagement and maximize profit.
Integrating your Marketo data with Snowflake can significantly enhance your marketing analytics and performance. Marketo, as a leading marketing automation platform, generates large volumes of valuable customer and campaign data. However, to fully leverage this data for advanced reporting and analytics, you need a powerful data warehousing solution like Snowflake.
With a Marketo to Snowflake integration, you can centralize your marketing data, run complex queries, and gain actionable insights that drive better decision-making. In this article, we will explore two effective methods for integrating your Marketo data into Snowflake, allowing you to optimize your marketing campaigns and improve business outcomes.
Let’s get started with a brief overview of both platforms. Feel free to jump right to the integration methods if you’re familiar with both Marketo and Snowflake.
An Overview of Marketo
Marketo is a marketing automation platform that enables you to manage multi-channel programs and create engaging campaigns that cater to your customers' diverse needs.
The platform supports marketing across digital channels, including mobile, web, social media, and more. This helps ensure a robust, engaging customer experience.
You can utilize Marketo’s analytics capabilities to engage customers effectively. Its diverse analytical tools provide insights into marketing performance, allowing your business to measure campaign effectiveness and ROI.
An Overview of Snowflake
Snowflake is a cloud-native data platform designed for high-performance analytics and data warehousing. Unlike traditional databases, Snowflake offers a fully managed, serverless architecture that eliminates the need for manual maintenance and infrastructure management. This allows businesses to focus on data analysis rather than system upkeep, ensuring that marketing data from tools like Marketo can be processed and analyzed efficiently.
A key feature of Snowflake is its ability to separate compute and storage layers, allowing each to scale independently based on the needs of the business. This flexibility ensures that large volumes of Marketo data can be ingested, processed, and queried in real time, providing timely insights to marketing teams. Additionally, Snowflake supports multi-cloud environments, enabling organizations to centralize their data from various sources, including Marketo, into a single, unified platform for better decision-making.
Why Integrate Marketo to Snowflake?
- Advanced Marketing Analytics: By integrating Marketo with Snowflake, you can run complex queries across your marketing data, enabling deeper analysis of customer behavior and campaign performance. This helps you identify trends, measure ROI more accurately, and optimize campaigns for greater efficiency and effectiveness.
- Centralized Data for Cross-Channel Insights: Snowflake allows you to consolidate Marketo data with other sources, such as CRM or social media platforms, to gain a holistic view of your customer journey. This unified data approach enables better decision-making and enhances your ability to create personalized, targeted marketing strategies.
- Improved Campaign Optimization: With real-time access to Marketo data in Snowflake, you can monitor campaign performance and make faster adjustments. This ensures that marketing efforts are continuously optimized, leading to increased conversions and a more effective allocation of your marketing budget.
Methods to Integrate Marketo to Snowflake
- The Easy, Automated Way: Using Estuary Flow to Connect Marketo to Snowflake
- The Manual Way: Using Custom Code to Integrate Marketo to Snowflake
Method 1: Using Estuary Flow to Connect Marketo to Snowflake
Estuary Flow is a real-time ETL (Extract, Transform, Load) platform with CDC (Change Data Capture) capabilities.
With an easy-to-navigate UI and 100s of pre-built connectors, Estuary Flow simplifies the process of setting up data integration pipelines.
The platform ingests data from external sources with captures. It adds the captured data to Flow collections. These collections are real-time data lakes of JSON documents in cloud storage. The data from collections is then loaded into external destinations with materializations.
Estuary Flow has a lot to offer, including:
- Change Data Capture (CDC): Estuary Flow supports streaming CDC with incremental capture. This allows you to connect to a source and capture its (24-hour) history while also immediately starting to read a stream. The combined stream is then sent to the destination with sub-100ms latency or with any batch interval.
- ETL and ELT: Estuary Flow supports varied transformations; for ETL, you can use SQL and TypeScript transforms, and for ELT, you can use dbt at the destination.
- Many-to-many Connections: Estuary Flow helps you not only extract data from many sources but also load it into many targets with the same data pipeline.
Here are the steps to stream Marketo data into Snowflake using Estuary Flow.
Prerequisites
- A Marketo base URL, client ID, and client secret.
- A Snowflake account that includes a target database, virtual warehouse, schema, and appropriate user roles.
- An Estuary Flow account.
Step 1: Configure Marketo as the Source
- Sign in to your Estuary Flow account to access the dashboard.
- Click Sources on the left panel of the dashboard.
- On the Sources page, click on the + NEW CAPTURE button.
- You will see a Search connectors box on the Create Capture page. Type Marketo in this box to find the connector.
- The Marketo connector will appear in the search results. Click the connector’s Capture button to proceed with the configuration.
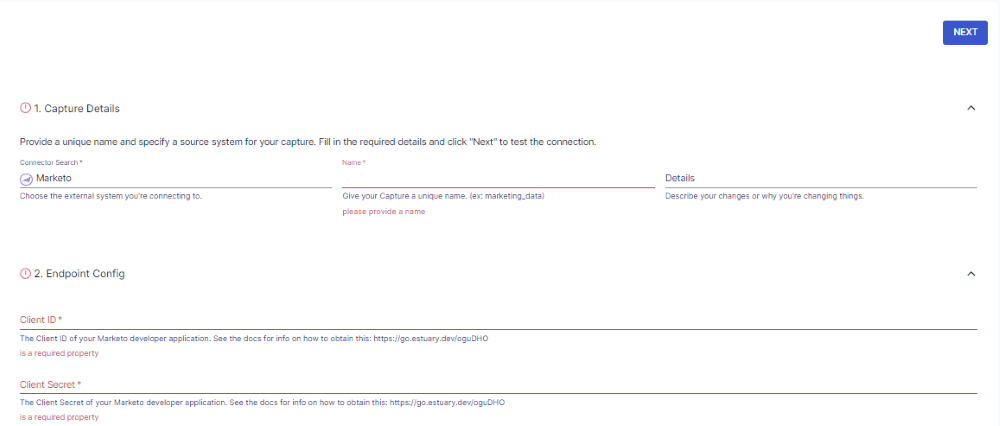
- On the connector configuration page, fill in the following details:
- Name: Give a unique name for your capture.
- Client ID: Specify the client ID of your Marketo developer application.
- Client Secret: Provide the client secret of your Marketo developer application.
- Start Date: This is the date (in UTC date and time format) from which you want to replicate the data.
- Domain URL: This is your Marketo base URL.
- Name: Give a unique name for your capture.
- After filling in the mandatory fields, click NEXT on the top right corner of the page. Then, click SAVE AND PUBLISH.
The batch connector will capture data from your Marketo account from the specified start date into a Flow collection.
Step 2: Configure Snowflake as the Destination
- After configuring Marketo as the source connector, click on Destinations on the left-side pane of the dashboard to start configuring the destination end of the integration pipeline.
- On the Destinations page, click the + NEW MATERIALIZATION button.
- Search for Snowflake using the Search connectors field on the Create Materialization page.
- When you see the Snowflake connector in the search results, click its Materialization button to proceed with the connector configuration.
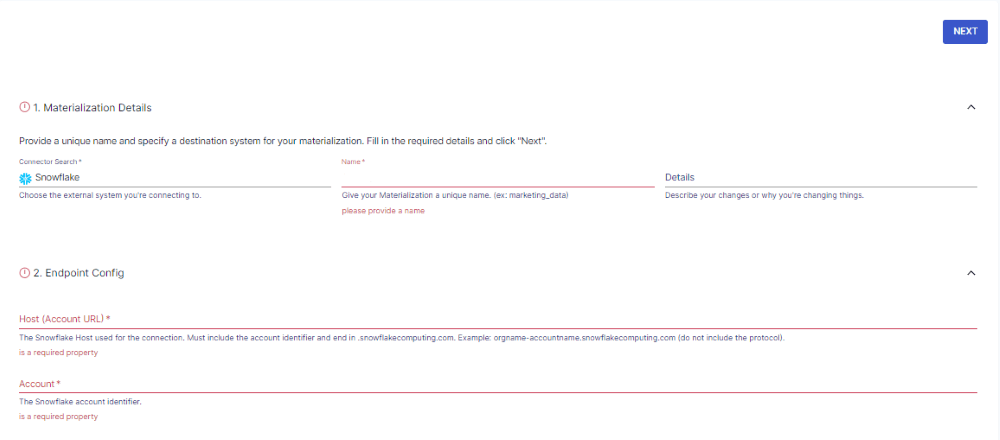
- On the Create Materialization page, enter all the necessary fields, including:
- Name: Give a unique name for your materialization.
- Host (Account URL): This is the Snowflake host used for the connection.
- Database: Specify the Snowflake SQL database to connect to.
- Schema: The Snowflake database schema.
- Name: Give a unique name for your materialization.
- To authenticate your Snowflake account, you can use your Snowflake user login name and password or key-pair authentication (JWT authentication).
- To manually add the source collection of your Marketo data to the materialization, click on the SOURCE FROM CAPTURE button in the Source Connections section.
- Finally, click NEXT > SAVE AND PUBLISH to complete the configuration process.
This real-time connector will materialize Flow connections of your Marketo data into a table in your Snowflake database.
The data changes are first uploaded to a Snowflake table stage and then transactionally applied to the Snowflake table.
Method 2: Using Custom Code to Integrate Marketo to Snowflake
An alternative method to integrate data from Marketo to Snowflake involves the use of custom codes. You can extract data from Marketo with Python codes and then use SnowSQL to load this data into Snowflake.
While this process is time-consuming and involves manual efforts, it does offer flexibility in terms of data handling and transformation.
Step 1: Extract Marketo Data Using a Python Library
To get started, install the marketorestpython library:
plaintextpip install marketorestpythonAfter the installation, follow these steps:
- Import the necessary libraries and set up your Marketo client with the appropriate credentials.
plaintextfrom marketorestpython.client import MarketoClient
import pandas as pd

munchkin_id = "your_munchkin_id"
client_id = "your_client_id"
client_secret = "your_client_secret"
api_limit = None
max_retry_time = None
mc = MarketoClient(munchkin_id, client_id, client_secret, api_limit, max_retry_time)- To extract activity data for a specified date range, run the following command:
plaintextact = mc.execute(
   method='get_lead_activities',
   activityTypeIds=['1'],
   sinceDatetime='2024-07-01',
   untilDatetime='2024-07-02')
activity_data = pd.DataFrame(act)
This code will extract all the activities between July 1-2, 2024, and load them into a pandas data frame.
Enter the date range to suit your requirements.
- To extract lead data based on specific filters and fields:
plaintextlead = mc.execute(
   method='get_multiple_leads_by_filter_type',
   filterType='email',
   filterValues=['a@b.com', 'c@d.com'],
   fields=['firstName', 'middleName', 'lastName'],
   batchSize=None)

lead_data = pd.DataFrame(lead)- Finally, you can export the extracted data to CSV format, which is required for loading into Snowflake:
plaintextactivity_data.to_csv(‘activities.csv’, index=False)
lead_data.to_csv(‘leads.csv’,index=False)
Step 2: Import CSV into Snowflake
- Use SnowSQL to access your Snowflake account.
- Create a Snowflake table that matches the structure of your CSV data. Here’s a sample command for this:
plaintextCREATE TABLE my_table (
  column1 TYPE,
  column2 TYPE,
)- To upload files directly from your local machine, create an internal stage:
plaintextCREATE STAGE my_int_stage
ENCRYPTION = (TYPE = 'SNOWFLAKE_SSE');- Upload your CSV file to the internal stage:
plaintextPUT file:///path/to/your/data.csv @my_int_stage;- Execute the COPY INTO command to transfer data from the staged CSV into your Snowflake table:
plaintextCOPY INTO my_table
FROM @my_int_stage;
FILE_FORMAT = (TYPE = ‘CSV’, FIELD_OPTIONALLY_ENCLOSED_BY = ‘“’);
Limitations of Loading Data from Marketo to Snowflake Using Custom Codes
- Time-Intensive: Manually migrating data from Marketo to Snowflake using custom code requires significant setup and ongoing maintenance. Writing, testing, and updating code for data extraction, transformation, and loading (ETL) is a labor-intensive process. This results in a time-consuming workflow that diverts valuable resources away from more strategic tasks like campaign optimization or data analysis.
- Lack of Real-Time Data Sync: Custom code-based processes generally do not support real-time data synchronization. Any updates or changes made in Marketo are not automatically reflected in Snowflake. To get the latest data, you need to rerun the scripts, leading to data delays that can be problematic for use cases requiring up-to-date information, such as real-time analytics or dynamic pricing.
- Manual Data Transformation: After extracting data from Marketo, it often requires additional transformation to fit into Snowflake's data schema. This process involves writing and maintaining extra code for data formatting, which requires technical expertise and adds complexity to the migration process, further slowing down data availability for analysis.
Summing It Up
Integrating Marketo with Snowflake enhances your understanding of customer behavior and lead generation, enabling you to create more targeted marketing strategies that drive business growth.
One approach is to build custom integrations using Python and SQL. While effective, this method can be time-consuming, labor-intensive, and lacks real-time data synchronization.
To overcome these challenges, a tool like Estuary Flow offers a more efficient solution. With over 200 pre-built connectors, real-time data synchronization, and low-latency transformations, Estuary Flow simplifies your data integration process, ensuring timely and accurate insights.
Want to perform streaming data transfers from various sources to destinations with minimal latency? Sign up for your Estuary Flow account today.
FAQs
How does integrating Marketo with Snowflake improve marketing performance?
Integrating Marketo with Snowflake allows you to centralize your marketing data and perform advanced analytics. By running complex queries and combining Marketo data with other sources, like CRM or sales data, you can gain a more comprehensive understanding of customer behavior. This enables more effective audience segmentation, targeted campaigns, and personalized customer experiences, which ultimately improve campaign performance and increase ROI.
What are the limitations of manually integrating Marketo data with Snowflake?
Manually integrating Marketo data into Snowflake using custom code can be challenging. It often involves significant time and effort, requires ongoing maintenance, and lacks real-time data synchronization. This can lead to delays in accessing data and missed opportunities to make timely decisions based on current insights. For businesses needing up-to-date, accurate data to optimize campaigns quickly, this method may not be scalable or efficient enough.
How can Estuary Flow simplify the Marketo to Snowflake integration process?
Estuary Flow automates the entire data integration process, offering real-time synchronization and over 200 pre-built connectors, including for Marketo and Snowflake. This not only reduces the manual effort involved in managing data pipelines but ensures your data is always current and ready for analysis. By using Estuary Flow, you can focus on extracting valuable insights and optimizing campaigns, rather than dealing with the complexities of custom code, making it the ideal solution for businesses looking to streamline their data processes and achieve faster business outcomes

Author
Popular Articles


