Uploading CSV to Snowflake offers scalable storage solutions that allow you to store large amounts of structured and semi-structured data efficiently. Transferring data from CSV to Snowflake can be highly beneficial for data professionals, analysts, and engineers. Snowflake’s advanced data analytical capabilities empower users to conduct comprehensive data analysis and execute complex queries with ease.
In this guide, we will explore three reliable methods to upload CSV to Snowflake, ensuring data is easily accessible for analysis and reporting.
Why Upload CSV to Snowflake? Benefits and Use Cases
Snowflake’s flexibility and scalability make it the go-to platform for storing CSV data, whether you're dealing with small datasets or terabytes of structured data. By uploading CSV files to Snowflake, you can leverage its advanced computing power for business intelligence, data analytics, and real-time processing.
What is a CSV File?
Comma-separated value (CSV) is a simple text file used to store data separated by commas. The CSV file format is highly compatible and supported by various applications like Microsoft Excel, Google Sheets, databases, and programming languages.
Data in CSV files are stored using a comma-delimited format, making it easier to convert your data into rows and columns. This allows you to conveniently read, edit, and transfer your data to different systems. As a result, data professionals use CSV to import and export data between databases for data professionals.
Snowflake Overview: The Destination for Your CSV Files
Snowflake is a comprehensive Software-as-a-service solution that offers a unified platform for data warehousing, data lakes, data engineering, data science, and data application development. It facilitates secure sharing and real consumption of shared data. The architecture of Snowflake consists of three layers—storage, compute, and cloud services, each of which is independently scalable to support advanced data analytics.
Snowflake offers adaptable storage capacity capable of managing petabytes of data in a single operation. Customers can use storage and computing separately while paying for only what they use. Snowflake efficiently handles various data types, including structured and semi-structured data, which is especially useful when uploading CSV to Snowflake.
Snowflake is accessible to the three major providers—AWS, Azure, and GCP. You can easily integrate your existing cloud architecture with Snowflake and choose to deploy it in your preferred location.
3 Reliable Ways to Upload CSV to Snowflake
Let’s look into the three methods you can use to upload your CSV files to Snowflake:
Method 1: Using Snowsight to Upload CSV to Snowflake
Method 2: Upload CSV to Snowflake Using SnowSQL
Method 3: Automate CSV to Snowflake Uploads with Estuary Flow
Method 1: Using Snowsight to Upload CSV to Snowflake
Uploading a CSV file to Snowflake can be efficiently done using the Snowflake web interface, Snowsight. This user-friendly platform simplifies the process, making it accessible even for those who are not deeply technical.
Pre-requisites
Step 1: Login/Register on Snowsight
- Login to your Snowsight account.
- In the navigation menu, select Data and then click on Databases to choose your desired database.
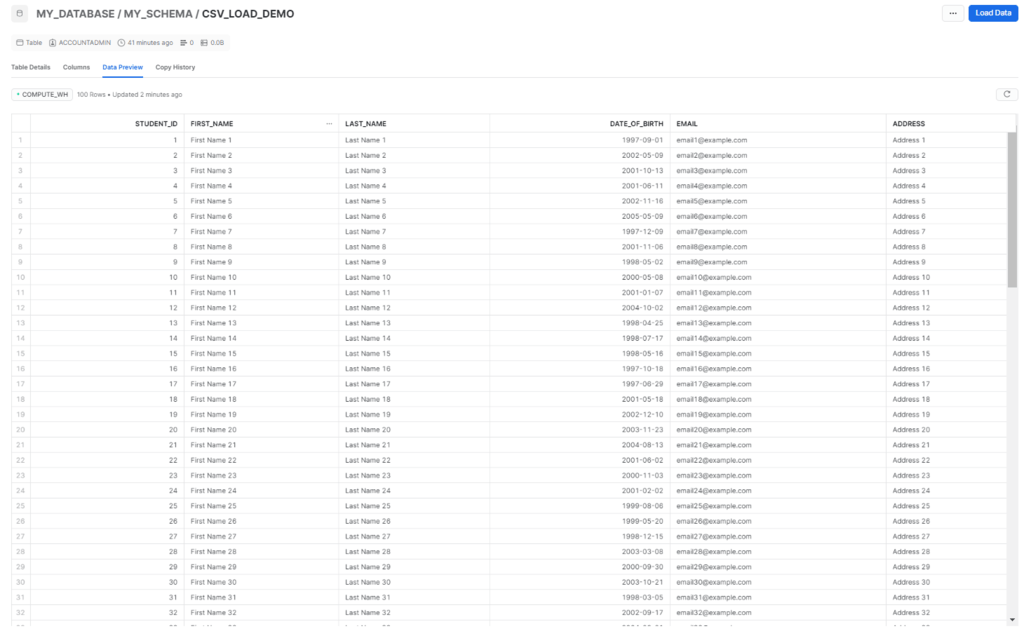
Step 2: Choose or Create a Table Using the Interface
- To set the context for your data loading process, select the desired database and schema from the list.
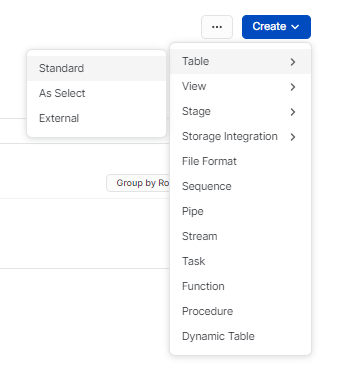
- Choose your table or create a new standard table from the interface.
Here’s an example query for creating a table.
plaintextcreate or replace TABLE MY_DATABASE.MY_SCHEMA.CSV_LOAD_DEMO (
  student_id INTEGER,
  first_name VARCHAR(50),
  last_name VARCHAR(50),
  date_of_birth DATE,
  email VARCHAR(100),
  address VARCHAR(200)
);- Alternatively, you can select an existing table in which you want to load data.
Step 3: Data Loading Operation for the Selected Table
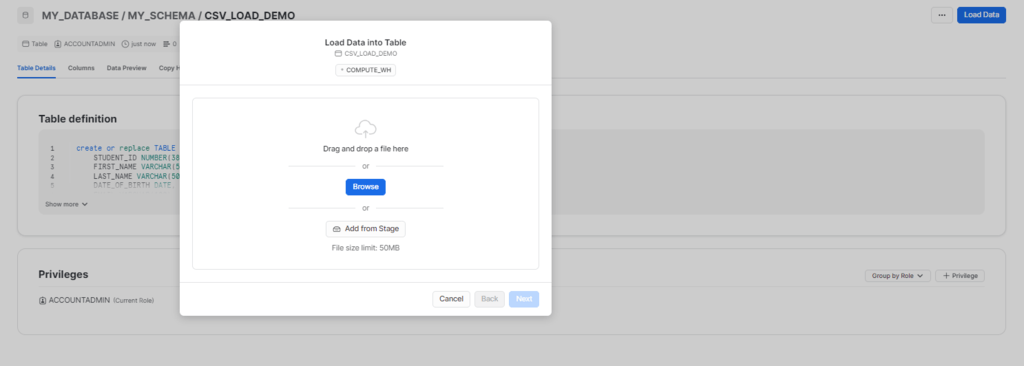
- Choose your preferred table and click on Load Data from the list of tables available.
- To upload structured or semi-structured data files, choose the Upload a File option in the Load Data Into Table dialog box.
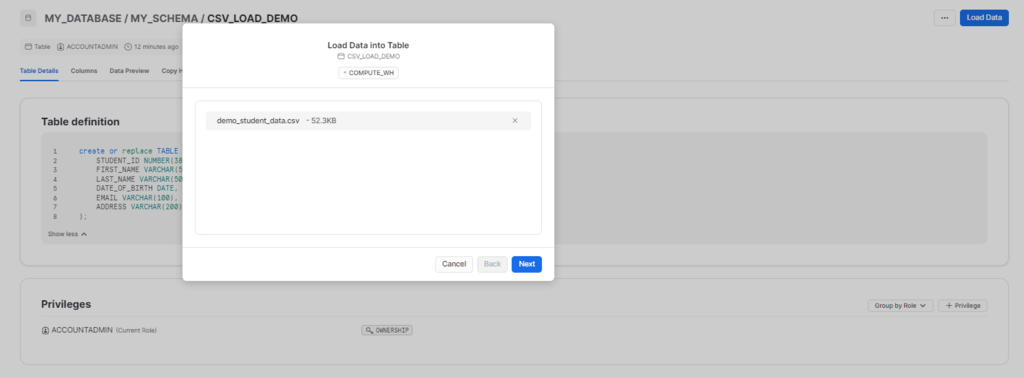
- You can either drag and drop your data files or use the file selection dialog.
- If no warehouse is set, choose from available options to process the data loading operation by specifying the warehouse.
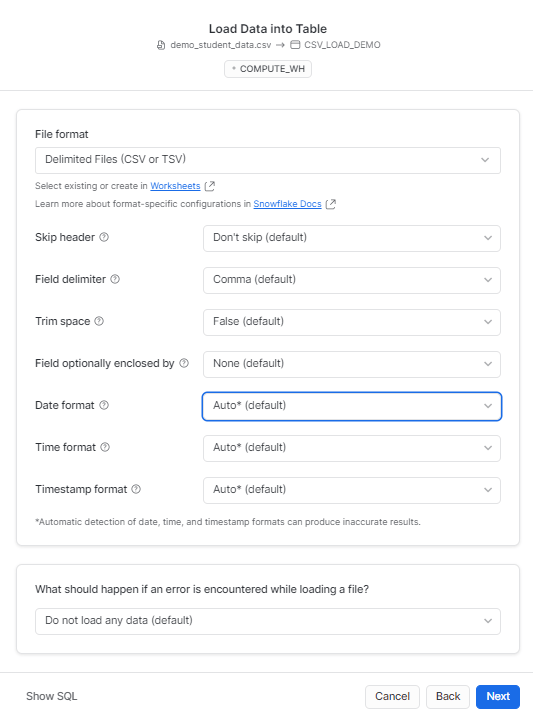
Step 4: Selecting the Correct File Format
- Choose a predefined file format from the current database or customize the file type by adjusting the relevant settings.
- You can either use the above option, or you can simply use the following SQL query.
Example query of the file format:
plaintextCOPY INTO "MY_DATABASE"."MY_SCHEMA"."CSV_LOAD_DEMO"
FROM '@"MY_DATABASE"."MY_SCHEMA"."%CSV_LOAD_DEMO"/__snowflake_temp_import_files__/demo_student_data.csv'
FILE_FORMAT = (
    TYPE=CSV,
    SKIP_HEADER=0,
    FIELD_DELIMITER=',',
    TRIM_SPACE=FALSE,
    FIELD_OPTIONALLY_ENCLOSED_BY=NONE,
    DATE_FORMAT=AUTO,
    TIME_FORMAT=AUTO,
    TIMESTAMP_FORMAT=AUTO
)
ON_ERROR=ABORT_STATEMENT
PURGE=TRUE- Click on Next.
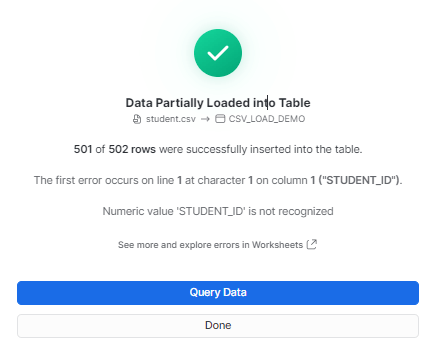
Step 5: Loading CSV Data into Snowflake Table
- Snowsight will start loading your files and display the number of rows successfully inserted in the target table.
- Once the data is loaded, you can proceed with one of the two options:
1) Select Query data to open a worksheet with SQL syntax for querying your table.
2) Select DONE to finish the data loading process.
- The above steps will complete the process of uploading CSV files to Snowflake.
Method 2: Using SnowSQL to Upload CSV to Snowflake
Another way to upload CSV data to Snowflake is using the SnowSQL client. This method is also suitable for bulk loading CSV data into Snowflake. Here are the detailed instructions for this.
Step 1: Install and Configure Snowflake
Download and install the SnowSQL client from the official Snowflake website and configure it using the recommended parameters. This typically involves editing the SnowSQL config file to include your account details, username, and password.
Step 2: Select the Target Database and Schema
Next, specify the database and schema you will be working with; run the command below.
| USE MY_DATABASE.MY_SCHEMA |
Step 3: Create a File Format for CSV Data
Define a file format in Snowflake that matches the format of your CSV file. This can be done by executing the below command.
| CREATE OR REPLACE FILE FORMAT student_csv_format TYPE = 'CSV' FIELD_DELIMITER = ',' |
Step 4: Create the Target Table
Create a table in Snowflake that matches the structure of your CSV file. Use the below command to create the table.
| CREATE OR REPLACE TABLE STUDENT_CSV_LOAD_DEMO2 ( student_id INTEGER, first_name VARCHAR(50), last_name VARCHAR(50), date_of_birth DATE, email VARCHAR(100), address VARCHAR(200) ); |
Step 5: Upload the CSV File to a Snowflake Stage
Upload the CSV data to the created stage by using the PUT command. Here’s a sample command you can run in SnowSQL to execute this process.
| put file://C:\Users\default.LAPTOP-A2VTF9HN\Desktop\CG\csvtest\student.csv @student_demo_record_stage; |
Step 6: Verify Stage Data
Verify whether the CSV data has been correctly loaded into the stage. Given below is a sample command to do this.
| SELECT col.$1, col.$2, col.$3, col.$4, col.$5, col.$6 FROM @student_demo_record_stage (file_format => student_csv_format) col; |
Step 7: Load Data from the Stage to Snowflake
- Load the data from the staged file into your target table with the COPY INTO command. Here’s a sample command to start the data-loading process.
COPY INTO STUDENT_CSV_LOAD_DEMO2 FROM @student_demo_record_stage; |
- To load only specific columns, you can use the below command.
| COPY INTO STUDENT_CSV_LOAD_DEMO2 FROM ( SELECT col."$1", col."$2", col."$3", col."$4", col."$5", col."$6" FROM @student_demo_record_stage (file_format => student_csv_format) col ) ON_ERROR = 'CONTINUE'; |
Step 8: Validate the Loaded Data
After executing the COPY INTO command, verify that the data has been loaded correctly by querying the target table using the SELECT command.
| SELECT * from STUDENT_CSV_LOAD_DEMO2; |
By following these steps, you will be able to load your CSV data to Snowflake using SnowSQL.
Limitations of Manual Methods for Uploading CSV to Snowflake
- Scalability: Manually uploading CSV files isn’t a scalable solution for large datasets or frequent updates. Increasing data volumes makes it cumbersome and time-consuming as you need to split the data.
- Human Error: The manual process is prone to human errors such as selecting the wrong file, mapping columns incorrectly, or making mistakes during the upload process.
- Security Risks: Transferring data manually involves security risks, especially if the data contains sensitive information. Using ETL and data integration tools will provide better security measures.
Method 3: Using Estuary Flow to Automate CSV Uploads to Snowflake
One can efficiently migrate data from CSV to Snowflake using extract, transform, load (ETL) tools like Estuary Flow. It is an effective no-code, real-time ETL tool that streamlines data migration. This is especially useful for high-performance needs and fluctuating data volumes.
Estuary Flow makes it simple to upload CSV files to Snowflake in just a few clicks. Therefore, persons with minimal technical expertise can use this tool to transfer data to Snowflake and other supported platforms. If you are new to Estuary Flow, follow this step-by-step process to upload CSV files to Snowflake easily.
Pre-requisites
Step 1: Login or Register
- To start uploading CSV files to Snowflake, visit the Estuary Flow website and log in to your Estuary account. If you don’t already have one, then register for a new account.
- On the Estuary dashboard, click the Sources option on the left.
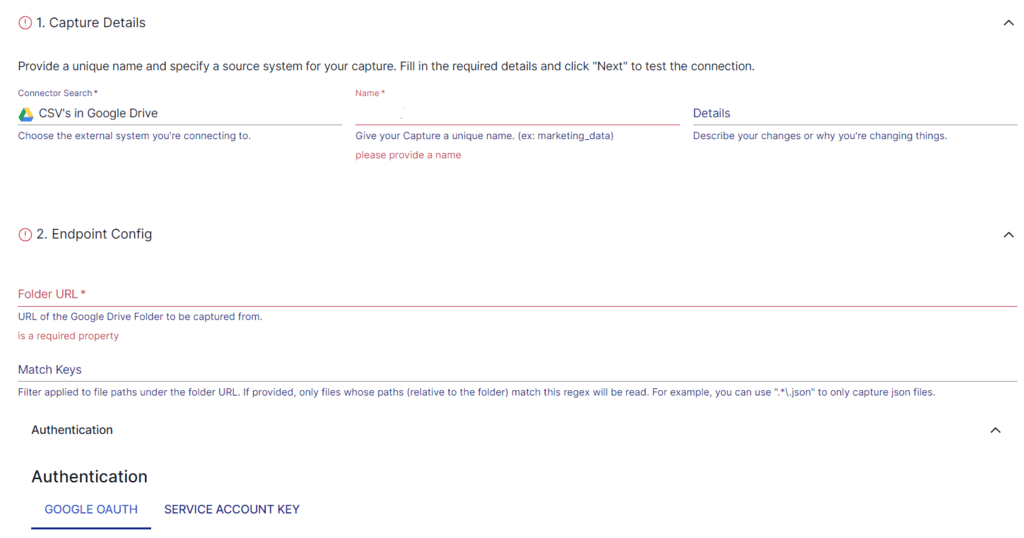
Step 2: Configure CSV as the Source Connector
- Click the + NEW CAPTURE button on the top left corner of the Sources page.
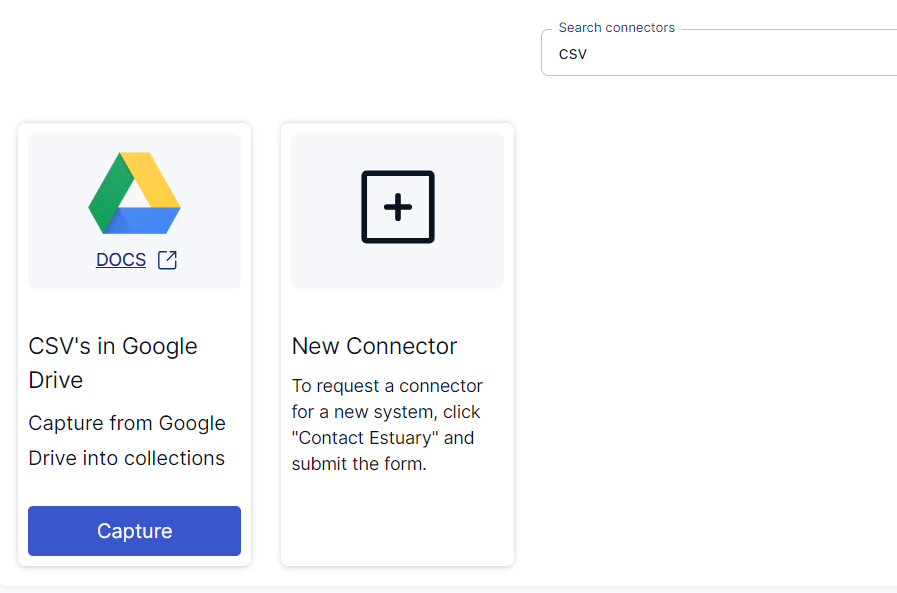
- Search for the CSV connector in the search bar and click on the connector’s Capture button when it appears in the search results.
- You will be redirected to the CSV connector page. On this page, provide information such as your Name, Folder URL, and more. You can also setup advanced and parser settings for better customization.
- Click on NEXT > SAVE AND PUBLISH.
Step 3: Configure Snowflake as the Destination
- After configuring the source, click on the Destinations button on the left pane of the dashboard.
- Click on the + NEW MATERIALIZATION button on the Materializations page.
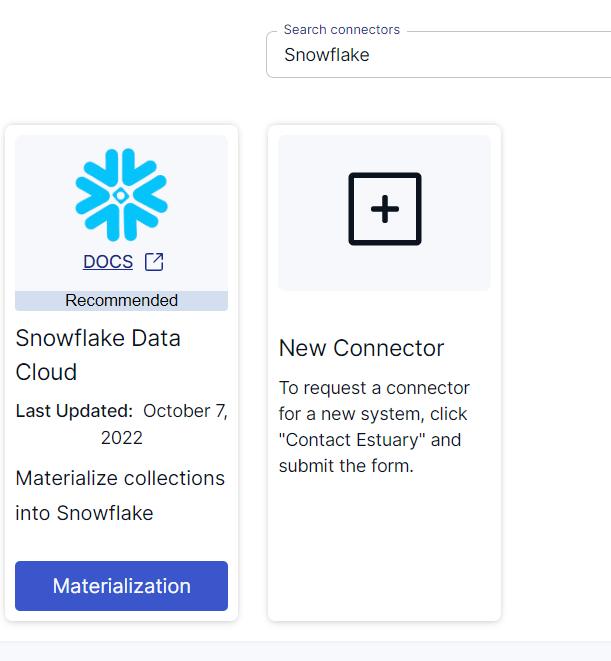
- Search for the Snowflake connector in the search bar and click on its Materialization button when you see it in the search results.
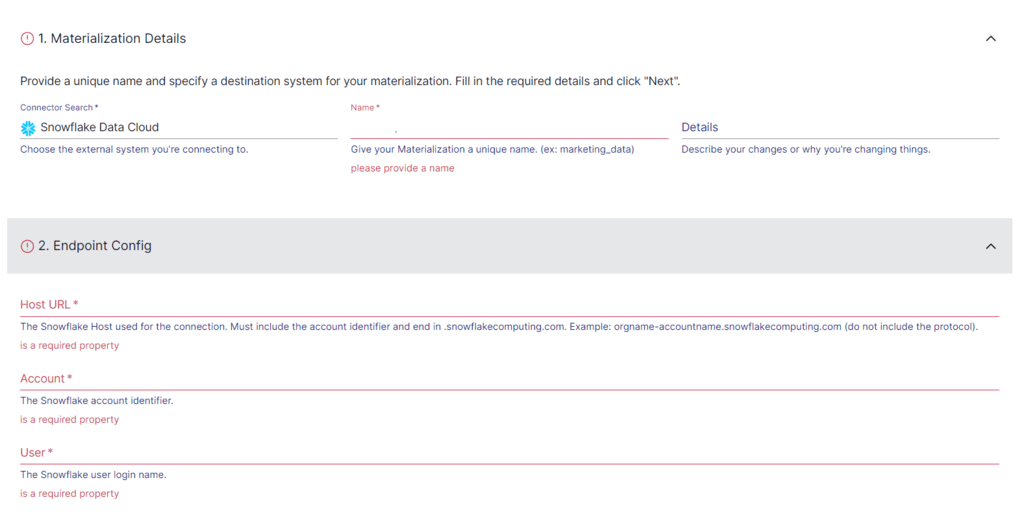
- You will be redirected to the Snowflake connector configuration page, where you must provide all the relevant details, such as Host URL, Account, User, Password, and Schema.
- Click on NEXT > SAVE AND PUBLISH. This will complete the loading of your CSV data to Snowflake.
BONUS: Check out how to move your data from Google Cloud Storage (GCS) to Snowflake in two simple steps.
Benefits of Using Estuary Flow to Upload CSV to Snowflake
- Integrated Connectors: Estuary Flow has over 200 pre-built connectors for effortless integration of data from the source to the destination without having to write a single line of code.
- Security Measures: Estuary Flow uses encryption, authentication, and authorization to protect the integration process. It protects sensitive information, mitigates potential risks, and ensures compliance with security standards and regulations.
- Automated Operations: Estuary Flow automates operations, including automated schema management and data deduplication, revolutionizing efficiency by autonomously organizing data structures and eliminating duplicate entries.
In Summary: CSV to Snowflake
Loading CSV to Snowflake is important for companies that use large volumes of data with vast customer databases. This can be done effortlessly with three different methods—using an automated, no-code ETL tool like Estuary Flow, web interfaces like Snowsight, or SnowSQL to upload data. The manual methods are time-consuming and complex for large databases and may require technical expertise.
Estuary Flow simplifies the data uploading process, reducing the complexity typically associated with manual methods of uploading CSV files to Snowflake. It also offers enhanced scalability, adapting to varying data volumes, which is important for businesses dealing with large amounts of fluctuating data.
Would you like to upload CSV files to Snowflake without any hassle? Sign up to get started with Flow today and upload your CSV files in just a few clicks.
FAQs
Can I upload an Excel file in Snowflake?
Yes, you can upload an Excel file in Snowflake. First, you need to convert the Excel file to CSV, and then you can load it into a Snowflake table.
Can I upload a CSV file in Snowflake?
Yes, you can upload a CSV file in Snowflake. You can use Classic Console or Snowsight to upload files that contain structured or semi-structured data. Alternatively, you can also use the Snowflake web interface to load data files up to 250 MB in size.
How to upload data to the Snowflake table?
- Log in to your Snowflake account and select a table to load data into.
- In the Table Details section, click the Load button to open the Data Wizard.
- Select a cloud storage location where you want to load your data.
- Choose the file format and select the Load option for error handling.

Author
Popular Articles


