With the rise of remote work culture, increasingly complex projects, and more distributed teams, organizations are using Confluence. It is a centralized collaboration platform for creating, organizing, and sharing information through a single intuitive interface. However, Confluence cannot process and manage large-scale data effectively.
This limitation can be overcome by integrating Confluence with Redshift. Amazon Redshift is a renowned data warehousing solution that effortlessly handles massive workloads. You can leverage Redshift’s high scalability and advanced analytical capabilities to optimize performance and gain enhanced insights.
This tutorial will explore two methods to connect Confluence to Redshift.
Confluence: An Overview
Confluence, developed by Atlassian, is a robust collaboration tool that enhances team interaction and project documentation. It provides a centralized platform where team members can create, share, and collaborate on projects, ideas, and requirements.
Confluence has two hosting options: Self-hosted and Cloud-based. In the self-hosted setting, you can host Confluence on in-house servers or data centers. On the other hand, in a cloud-based setting, you can host Confluence on the cloud and use it based on your chosen subscription plan. This flexibility easily accommodates different organizational preferences and requirements.
Let's dive into some of the critical features of Confluence.
Key Features of Confluence
- Knowledge Management: Atlassian Confluence's knowledge management system allows you to design and streamline documentation processes. The system enables you to produce unlimited pages with versioning and historical tracking. In addition, you can effortlessly create both parent and child pages using Confluence’s low-code interface.
- Role Access Management: Confluence offers role-based access to manage user permissions, including administrators, space administrators, and anonymous users. Role-based access enables efficient collaboration by allowing users only to access the data related to their roles and responsibilities. This reduces the clutter and ensures users can focus on their respective roles.
- Collaborative Project Management: A notable feature of Confluence is its Collaborative Project Management, which enhances real-time editing capabilities. By co-editing projects simultaneously, teams can seamlessly collaborate and make necessary changes.
- Gantt Charts: The Gantt Chart feature in Confluence enables users to create and visualize project schedules, milestones, and dependencies within their Confluence pages. You can define dependencies between projects and visualize them using the Gantt chart, helping identify critical paths and potential roadblocks in the project schedule.
Redshift: An Overview
Amazon Redshift is a fully managed data warehousing platform. It is designed to handle large-scale data analytics and process complex datasets efficiently.
For seamless query executions, Redshift uses columnar storage, which organizes data in columns rather than rows. This feature enhances query performance by allowing the system to read only the necessary columns from large datasets selectively. Redshift also employs compression algorithms to optimize the columnar storage, leading to significant storage savings and enhanced query performance.
Key Features of Redshift
- Fault Tolerant: Fault tolerance maintains the system's functioning even when some components fail. Redshift continuously monitors the health of the data cluster, automatically re-replicates data from the failed drives, and substitutes data as needed to ensure fault tolerance.
- Data Governance and Security: Redshift facilitates efficient data governance and security measures to safeguard your organization's data lifecycle and sensitive information. It helps maintain compliance with regulatory requirements and mitigate the risks associated with unauthorized access.
- Access Control: Redshift supports access controls at schema, table, and column levels. Administrators can define permissions to restrict access to sensitive data and limit the ability to modify database objects. You can configure access control policies in the Redshift Management Console or by using SQL commands.
Why Integrate Data From Confluence to Redshift?
Integrating data from Confluence to Redshift can help your organization streamline workflow and increase productivity.
Some benefits of connecting Confluence to Redshift are:
- Centralized Repository: By migrating data from Confluence to Redshift, you can consolidate all the data in a centralized repository, enabling you to manage your data efficiently.
- Scalability: To accommodate the growing volumes of Confluence data, you can leverage Redshift’s scalability. It lets you quickly scale your resources based on your needs without compromising performance.
- Advanced Analytics: By leveraging Redshift’s robust analytical capabilities, you can perform complex queries on your Confluence data for improved insights.
- Better Data Visualization: You can track the progress of a project in Confluence and view it on Redshift.
How to Transfer Data From Confluence to Redshift
Let’s look at how to load data from Confluence to Redshift:
- Method 1: Use Estuary Flow to migrate data from Confluence to Redshift
- Method 2: Creating a custom ETL pipeline from Confluence to Redshift
Method 1: Use Estuary Flow to Migrate Data From Confluence to Redshift
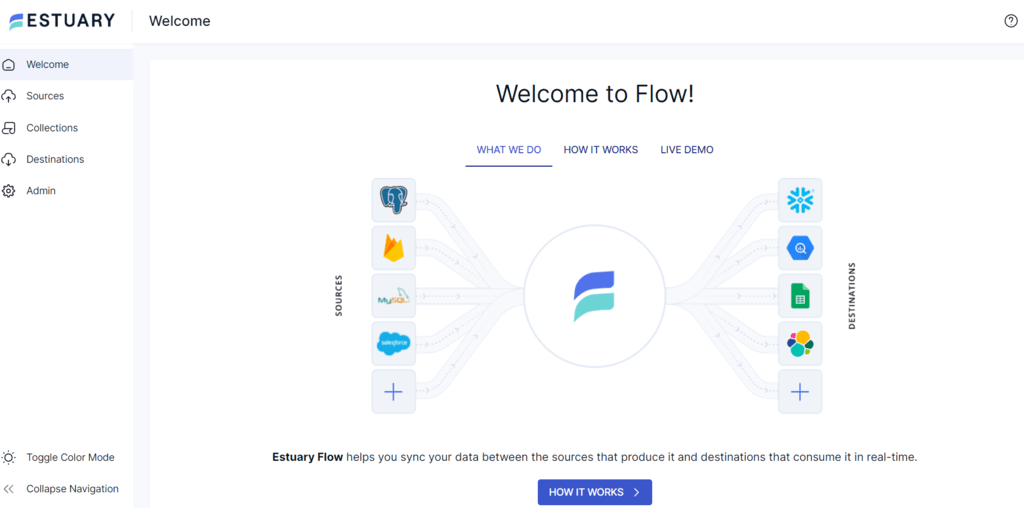
Estuary Flow is a data integration platform that facilitates establishing data pipelines to various data warehouses and storage systems. It comes with 300+ pre-built connectors, allowing you to build your data integration pipelines in a few seconds.
Key Features of Estuary Flow:
- Effective Data Transformations: Estuary facilitates TypeScript and SQL transformations for efficient data processing. Using TypeScript helps prevent typical pipeline failures and allows for fully type-checked data pipelines, ensuring data integrity throughout migration.
- Real-time Data Processing: It facilitates real-time data processing using Change Data Capture, ensuring data integrity and reduced latency.
- Scalability: Flow is designed to handle massive data volumes and high throughput demands by scaling operations horizontally. This scalability feature caters to businesses of all sizes and types.
- Less Human Errors: The pre-built connectors and automated processes in Estuary Flow help to reduce the likelihood of errors often encountered in manual migrations.
Before starting with Estuary Flow for your Confluence to Redshift integration, you must fulfill some prerequisites.
Step 1: Configure Confluence as the Source
- Sign in to your Estuary account using your credentials.
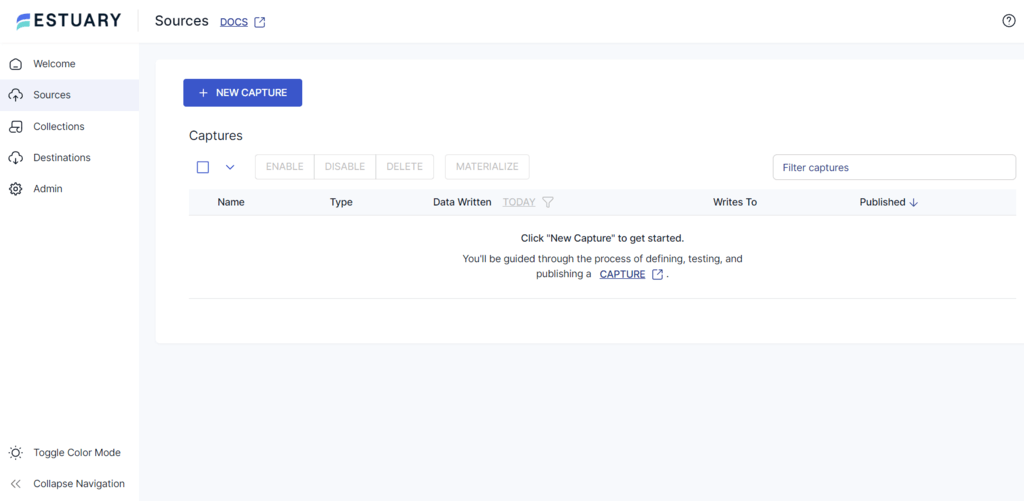
- On the left navigation pane, click the Sources option. Then, click on the + NEW CAPTURE button.
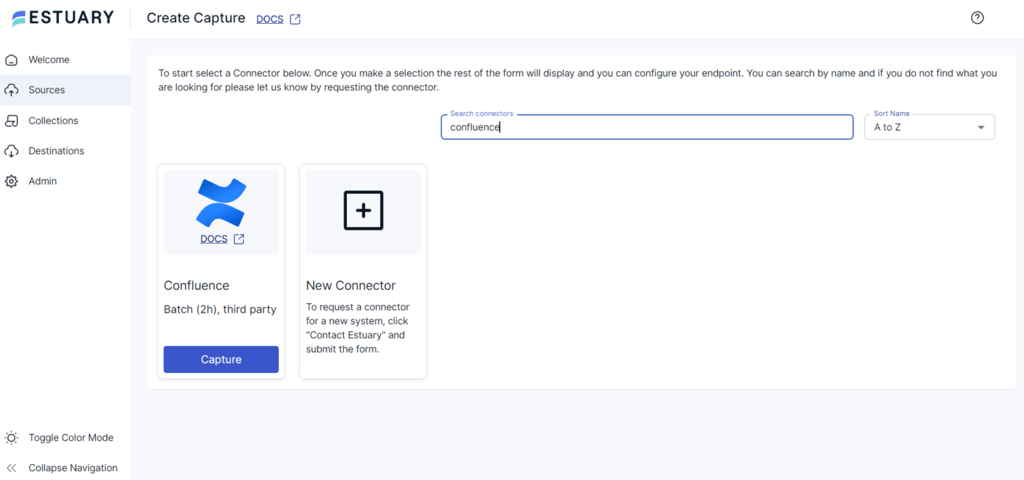
- On the Create Capture page, type Confluence in the Search connectors field. Click the Capture button of the Confluence connector.
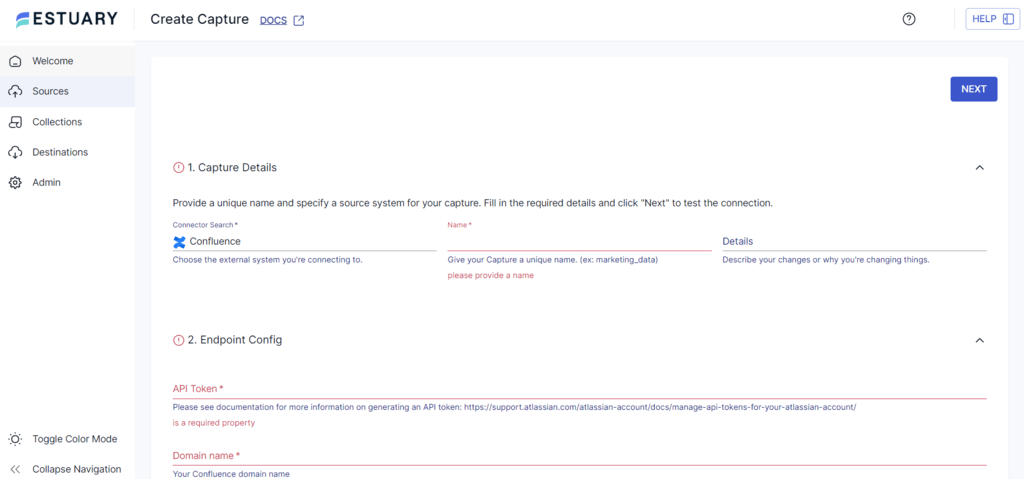
- Provide details such as Name, API Token, Domain name, and Email on the Create Capture page.
- Click NEXT > SAVE AND PUBLISH to complete the source configuration. The connector will capture data from Confluence and copy it into Flow collections via the Confluence Cloud REST API.
Step 2: Configure Amazon Redshift as the Destination
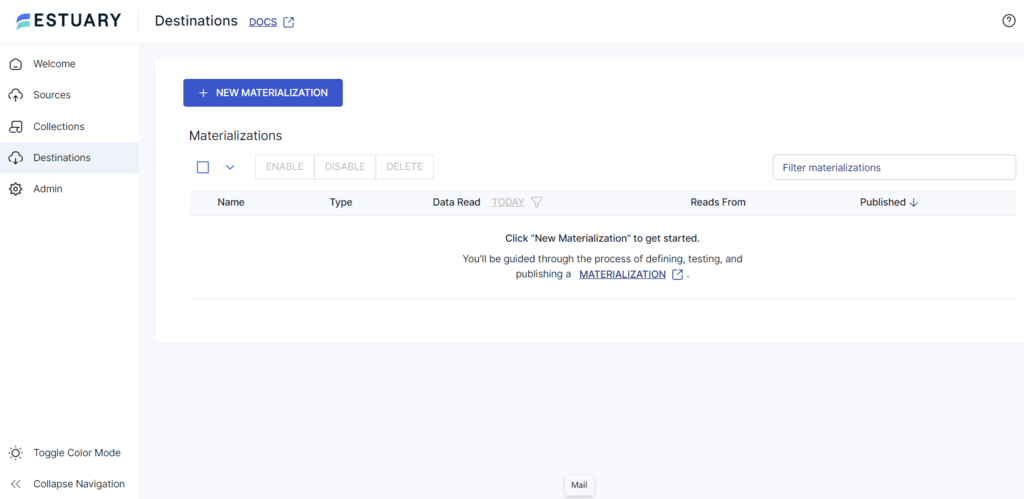
- Select the Destinations option on the left navigation pane of the Estuary dashboard.
- Click on the + NEW MATERIALIZATION button on the Destinations page.
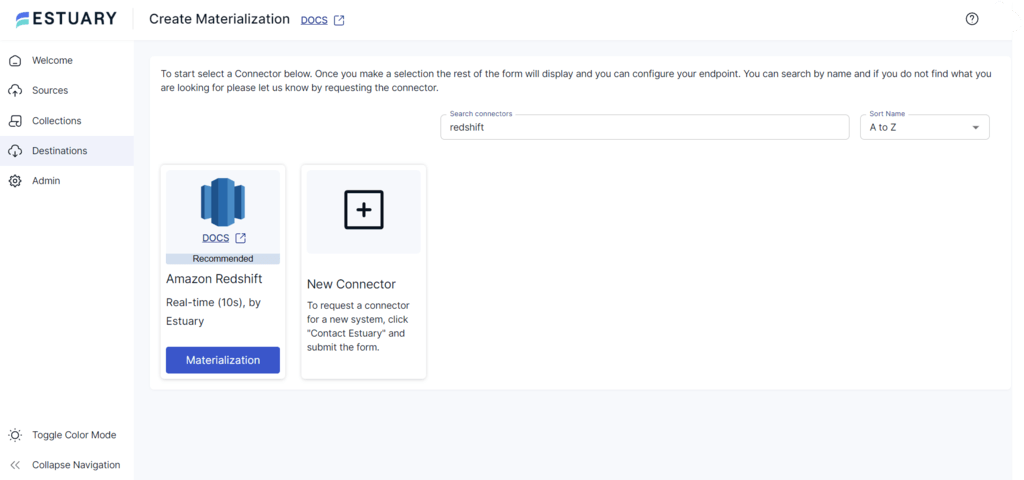
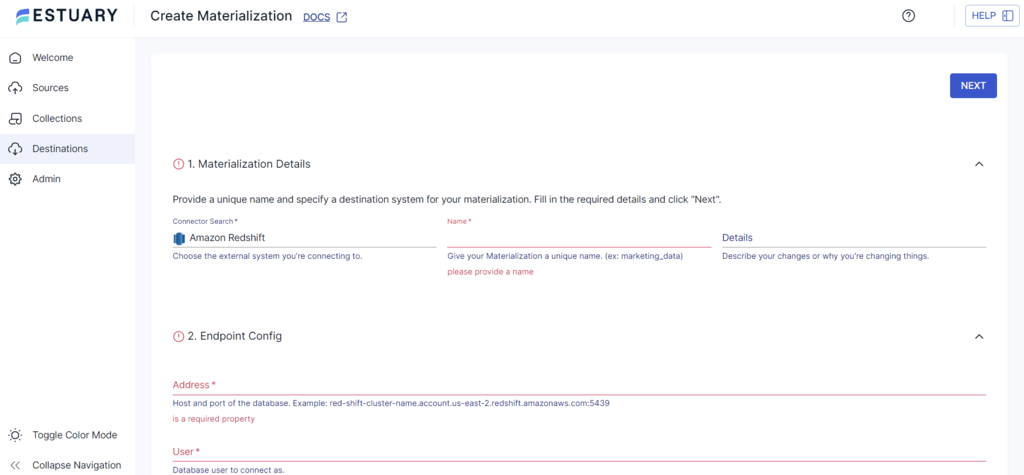
- On the Create Materialization page, use the Search Connectors field to search for the Redshift connector. Select the Amazon Redshift connector from the search results and click the Materialization button.
- On the Create Materialization page, provide the details such as Name, Address, User, Password, S3 Staging Bucket, Access Key ID, Secret Access Key, and Region.
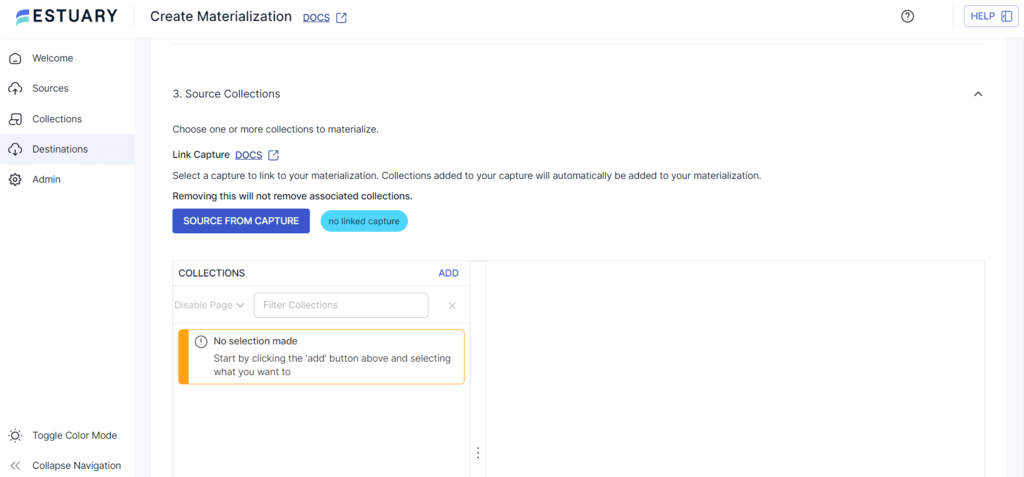
- If a capture hasn't been added to your materialization, click the SOURCE FROM CAPTURE button to select a capture.
- Click NEXT > SAVE AND PUBLISH to complete the configuration of Redshift as the destination.
These two straightforward steps allow you to replicate your data from Confluence to Redshift successfully.
BONUS: See our tutorial on how to transfer data from Jira to Redshift in just a few clicks.
Method 2: Creating a Confluence to Redshift Custom ETL Pipeline
Manually building ETL (Extract, Transform, Load) pipelines to load Confluence data to Redshift involves the creation of big data pipelines that extract data from Confluence, transform it, and load it into AWS Redshift.
To create a custom ETL pipeline, follow these steps:
- Refer to the Confluence API documentation.
- Begin your initial API request.
- Transform an API request into a data pipeline.
- Load the extracted data to Redshift.
In the API documentation, review some key concepts:
- Resources to identify the Confluence API endpoints essential for analytics.
- Authentication Mechanisms to integrate the necessary credentials into your API requests effectively.
- Request Parameters to understand the methods and URL for each endpoint.
To execute the Confluence API calls:
- Gather your Confluence API credentials for authentication.
- Then, select the API resource from which you wish to retrieve data.
- Configure the required credentials, methods, and URLs to access the desired data.
- Then, integrate your credentials and execute your first API call.
To start the production-grade pipeline for Confluence, follow these steps:
- Define the schemas for each API endpoint.
- Process and parse the API response data.
- Handle the nested objects and custom fields.
- Determine primary keys and distinguish between required and optional keys.
- Employ a git-based workflow for version control.
- Manage code dependencies and accommodate upgrades.
- Monitor the health of the upstream API and troubleshoot issues via status pages, support inquiries, and ticket submissions.
- Address error codes.
- Adhere to rate limits imposed by the server.
To load the extracted data to Redshift:
- Upload the transformed data to an Amazon S3 bucket, an intermediate staging area, before loading it into Redshift.
- Use the COPY command to load the data into Redshift tables. This command should include all the required credentials, such as the file path in the S3 bucket and the Redshift destination table.
Below is an example of how to use the COPY command:
plaintextCOPY table_name
FROM 'path_to_csv_in_s3'
CREDENTIALS
'aws_access_key_id=YOUR_ACCESS_KEY;aws_secret_access_key=YOUR_ACCESS_SECRET_KEY'
CSV;
Drawbacks of Creating the Custom Confluence-Redshift ETL Pipeline
The notable disadvantages of establishing a custom ETL pipeline between Confluence and Redshift are:
- Time-consuming: Building the custom pipeline requires significant resources and time for development. Apart from the initial setup, it also involved ongoing adjustments for regular maintenance.
- Dependency on Technical Experts: There is reliance on technical experts to set up and maintain custom ETL pipelines, reducing operational flexibility as certain tasks cannot be performed without them.
- Higher Costs: The cost of constructing and maintaining a custom pipeline is higher than that of dedicated ETL integration tools.
Get Integrated
Data integration from Confluence to Redshift significantly increases performance and scalability. With custom integration, it can be time-consuming and requires extensive technical expertise.
However, Estuary Flow streamlines the integration process by providing pre-built connectors, helping simplify the configuration of source and destination connections. It eliminates the need for custom coding, enabling near real-time data synchronization to connect Confluence to Redshift in minutes. In addition, Flow offers ease of use, scalability, and robust transformation capabilities to meet the needs of modern data integration workflows.
Would you like to transfer data between different sources and destinations almost instantaneously? Sign up for a free Estuary account now to simplify Confluence to Redshift integration.
Frequently Asked Questions (FAQs)
- Can I perform read-and-write operations between Confluence and Redshift?
While Confluence can connect to Redshift to read data, it cannot directly write data to Redshift. Redshift is optimized for data warehousing and analytics, so data is usually loaded into Redshift from other sources, such as AWS S3 buckets. - What are the top ETL tools for migrating data from Confluence to Redshift?
The top ETL tools for migrating Confluence to Redshift are Estuary Flow, Matillion, Talend Data Integration, Fivetran, and Stitch.

Author
Popular Articles


