Payment processing is a critical component of many businesses, yet traditional payment gateways often present challenges with scalability and security. Braintree tackles this problem by offering a modern solution with multi-currency support, fraud protection, 3D Secure, and more. However, the true value of Braintree’s data is further enhanced when its transactional data is integrated with a powerful data warehousing platform like Snowflake.
Migrating data from Braintree to Snowflake empowers you to perform in-depth analyses of transactions, payment preferences, and customer behavior data. This helps you gain new insights and better understand your customers.
In this guide, we will look into two methods for migrating data from Braintree to Snowflake. One is the manual approach, while the other method involves modern data integration solutions. Let’s dive in!
What Is Braintree?
Braintree is a leading payment gateway platform revolutionizing how businesses handle transactional data. It offers tools and features that empower businesses to accept payments seamlessly across various channels and devices. With a focus on innovation, security, and user experience, the platform streamlines the payment process, fueling business growth and customer satisfaction.
One of Braintree's standout features is its easy integration with popular e-commerce platforms, content management systems, and mobile applications. This seamless integration lets you quickly set up and accept payments without complex coding or development work. Whether it’s a web store, mobile app, or subscription-based service, Braintree provides flexible solutions that adapt to the needs and scale of business.
Here are some of its key features.
- Multi-currency Support: Braintree enables merchants to accept payments in multiple currencies, allowing them to cater to customers from around the world. This feature eliminates the need for customers to convert currencies themselves, providing a seamless checkout experience.
- Global Payment Methods: Braintree supports a wide range of international payment methods, including credit cards, digital wallets (e.g., PayPal, Apple Pay, Google Pay), and local payment methods (e.g., iDEAL, Alipay, Sofort). It helps merchants cater to customers' preferences in different regions, increasing the likelihood of successful transactions.
- Data Security: Braintree stores customers' cardholder data in the Braintree vault, which uses multiple encryption keys with split knowledge and dual control. This feature provides a layer of security. Even if the data gets stolen, one cannot access it without having the key.
What Is Snowflake?
Snowflake is a cloud-native data warehousing solution that offers impressive scalability for storing and analyzing large amounts of data. Snowflake’s flexible architecture makes it an excellent choice for handling and analyzing large volumes of structured and unstructured data.
One of Snowflake's key features is its separation of compute and storage. Unlike traditional data warehouses, Snowflake allows you to scale your computing resources independently from storage resources. This allows easy scaling and handling of varying workloads, resulting in improved performance and cost optimizations.
Here are some of Snowflake’s key features.
- Fully Managed Service: Snowflake is a fully managed service. All hardware provisioning, software maintenance, and infrastructure management are handled by the platform. This allows you to focus on analysis without having to worry about operational aspects.
- Automatic Query Optimization: This feature evaluates and executes queries in the most efficient manner possible. The system is designed to handle optimization behind the scenes, which means you do not need to manually tune your queries to achieve fast performance. The optimizer also takes into account factors like data distribution and query complexity to ensure optimal execution.
- Data Sharing Capabilities: Snowflake offers seamless data sharing capabilities, allowing organizations to share data sets securely with internal teams and external partners. This feature eliminates the need for complex data transfer or multiple copies of data, enabling efficient collaboration.
Migrating Data From Braintree to Snowflake
Migrating data from Braintree to Snowflake is an excellent choice for businesses that want to leverage Snowflake’s powerful analytical capabilities without having to worry about the infrastructure. There are two methods you can use to load data from Braintree to Snowflake.
- Method 1: Using Estuary Flow to migrate Data from Braintree to Snowflake
- Method 2: Using CSV Export/Import to Migrate Data from Braintree to Snowflake
Method 1: Using Estuary Flow for Braintree to Snowflake Integration
While manually migrating data from Braintree to Snowflow is an effective method, it’s mainly feasible for small volumes of data and infrequent cases of migration. It cannot serve as a long-term solution. For real-world situations where you need to migrate data constantly, opt for a no-code ETL (extract, transform, load) tool like Estuary Flow, as it helps automate the data migration process.
Here are the detailed steps to load data from Braintree to Snowflake using Estuary Flow.
Prerequisites
Step 1: Configure Braintree as the Source
- Login to your Estuary Flow account.
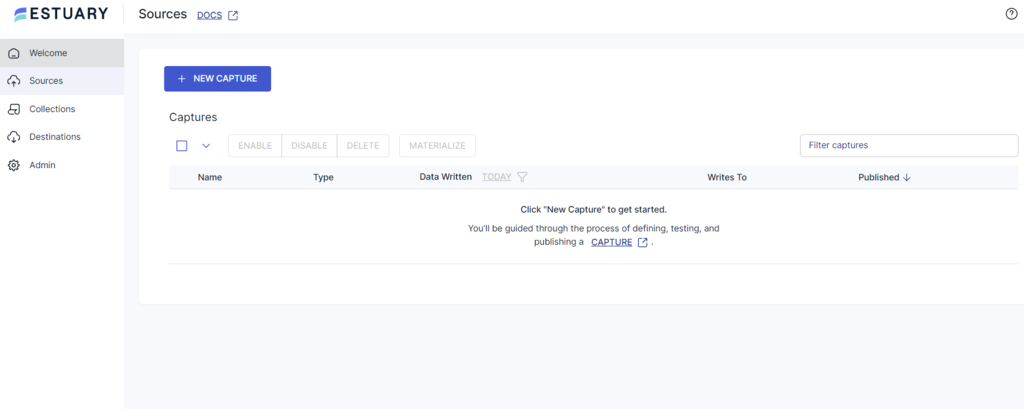
- Click the Sources tab on the left navigation pane. Then select the + NEW CAPTURE button.
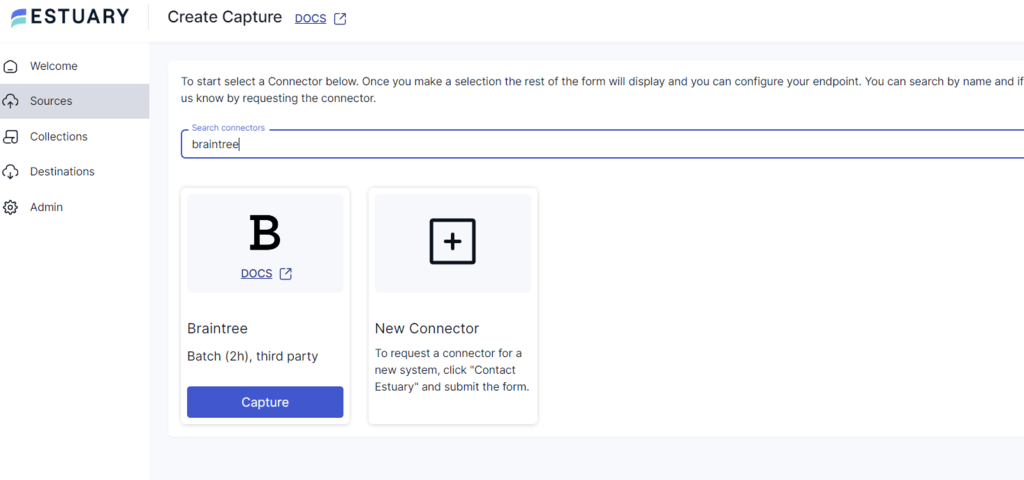
- Use the Search connectors field to find the Braintree connector and click its Capture button to start configuring it as a data source.
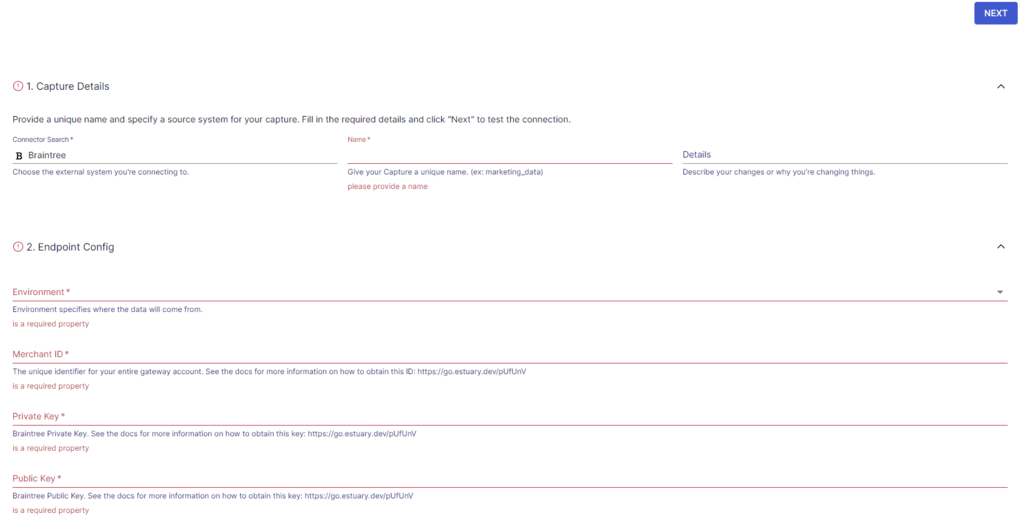
- In the Create Capture page, enter the mandatory details, such as Name, Environment, Merchant ID, and other fields. Then, click NEXT > SAVE AND PUBLISH to start transferring your Braintree data to Flow collections.
Step 2: Configure Snowflake as the Destination
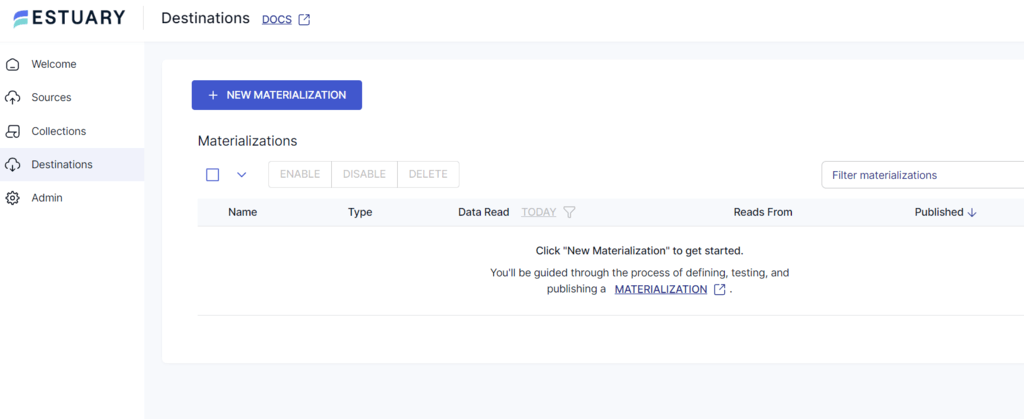
- After completing the source connector configuration, click MATERIALIZE COLLECTIONS in the resulting pop-up window or the Destinations option on the dashboard.
- Click the + NEW MATERIALIZATION button on the Destinations page.
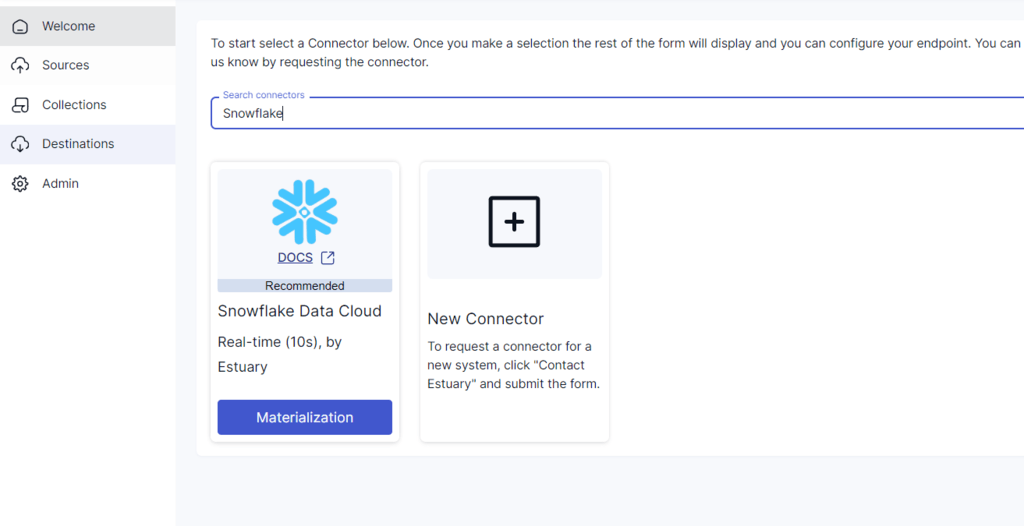
- Search for Snowflake in the Search connectors field and click the Materialization button to set it as the destination.
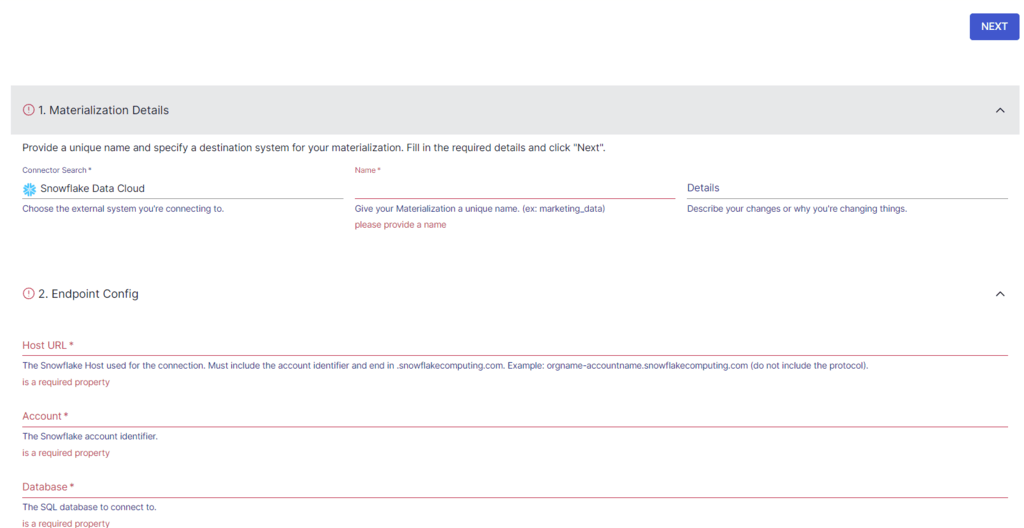
- Enter details such as Name, Host URL, Account, and more on the Create Materialization page.
- If your Braintree data collection isn’t automatically added to your materialization, you can use the Source Collections section to do this manually.
- Finally, click NEXT > SAVE AND PUBLISH to complete the configuration. The connector will materialize Flow collections of your Braintree data into Snowflake tables.
Benefits of Estuary Flow
Here are just some of the reasons why Flow is an excellent solution for optimizing your data integration workflows:
- Wide Range of Connectors: Estuary Flow offers a diverse range of connectors, including over 300 sources and destinations you can configure with just a few clicks. With a no-code configuration process, you can connect to your desired source or destination in minutes.
- Near Real-time Data Synchronization: Its near real-time data synchronization feature ensures rapid data transfer with minimal delay (in mere milliseconds), supporting continuous data streaming and low latency. This capability is crucial for applications requiring timely data availability and data integrity, such as real-time analytics and decision-making processes.
- Efficient Data Transformations: Flow enables efficient data transformation through its support for Typescript and SQL-based transformations. This feature allows users to dynamically reshape, filter, and join data in near real time.
Method 2: Using CSV Export/Import to Migrate Data From Braintree to Snowflake
This method involves exporting the data from Braintree’s Control Panel and loading it into Snowflake. Here are the detailed steps to manually transfer your Braintree data to Snowflake:
Step 1: Extracting Data From Braintree
Braintree’s Control Panel offers two methods for searching and exporting data: Basic Search and Advanced Search.
- Basic Search is a simple search bar in the UI's top right corner. You can use it to fetch generic information such as customer details, payment methods, and transaction details.
- Advanced Search provides a more robust and flexible way to fetch more detailed information about Transactions, Verifications, Vaults, and Subscriptions using filters. This gives you more granular control over the type of data you wish to export.
Fetching Transaction Data
The steps to export Transaction Data from Braintree are relatively simple:
- Log into the Braintree Control Panel.
- Click on the Transactions tab.
- Scroll down to the Transaction Search section and apply your desired filters.
- Finally, click on Search to retrieve the filtered transaction data.
Fetching Card Verification Data
Exporting the card verification data is also straightforward:
- Log into the Braintree Control Panel.
- Click on the Vault tab and select the Verifications tab.
- Apply filters based on your requirements in the Verification Search section.
- Click Search to fetch the filtered verification data.
Fetching Vault Data
If you need to export Vault data containing specific customer records, follow these steps.
- Log into the Braintree Control Panel.
- Navigate to the Vault section.
- Scroll down to the Customer Search section and apply relevant filters.
- Click on Search to retrieve the filtered customer data from the vault.
Exporting the Data as CSV
Once you have the desired data, you can download them as CSV files by clicking the Download button at the top of the search result page. You can view your download history in the Downloads section of the Braintree Control Panel.
Step 2: Loading CSV into Snowflake
After exporting the data from Braintree, the next step is to load it into Snowflake. Here are the steps to do this.
- Sign in to your Snowsight account.
- Proceed by selecting Data > Databases from the navigation menu.
- Choose your database and schema.
- Within the object explorer, select the table you wish to populate with the data.
- Click on Load Data to start the process.
- In the Load Data into Table window, click on Browse to choose your files.
- Proceed to upload the CSV files containing your Braintree data.
- Select a warehouse if a default warehouse hasn't been set for your account. Then click on Next to proceed.
- Now, you need to choose your file format. There are two options:
- Choose a pre-existing file format from the current database. In this case, it will be CSV.
- Opt for a custom file type, adjusting the settings to suit your data file.
- Optionally, decide on the course of action if an error occurs during the load process. By default, the system is set to not load any data from the file if errors are encountered.
- Next, click Load to begin importing your file. Upon completion, Snowsight will display the count of rows that were successfully added to the table.
By following the above steps, you can migrate your data from Braintree to Snowflake. However, this manual approach comes with its own set of limitations.
- Time-consuming Process: This method of data migration can be very time-consuming, involving multiple manual steps, including data extraction, transformation, and loading. Each of these steps needs to be performed accurately to maintain data integrity, increasing the entire process's duration.
- Increased Risk of Data Loss: Manual data handling increases the risk of data loss or corruption. Human errors during data extraction, transformation, or loading can lead to incomplete data migration, data corruption, or even the loss of critical data.
- Lack of Scalability: Scalability is another major concern when using manual migration methods. As the amount of data increases, the feasibility of such methods also decreases. This is especially problematic for businesses that handle large volumes of data or anticipate future data growth.
- Lack of Real-time Integration: Using CSV files to load data lacks real-time integration. CSV files are inherently static snapshots of data and require manual updates, making it difficult to obtain live and dynamic data. This limitation can hinder real-time data analysis and decision-making processes that rely on up-to-date information.
Conclusion
Migrating data from Braintree to Snowflake allows you to gain deeper insights into customer behavior, tailor marketing campaigns, enhance product offerings, and improve the overall customer experience. While feasible, manual migration processes, like CSV export/import, do not offer the reliability and flexibility that automated methods provide. Moreover, implementing manual methods is also much more complex and time-consuming.
A no-code SaaS tool like Estuary Flow provides an alternative solution for efficient data integration. All it takes is just a few clicks to set up your data pipeline and get it running.
Estuary Flow provides an extensive and growing list of connectors, robust functionalities, and a user-friendly interface. Sign up today to simplify and automate data migration from Braintree to Snowflake.
FAQs
- Is Snowflake a data warehouse?
Yes, Snowflake is a cloud-based data warehouse. It is designed for analytical workloads and provides a SQL interface for querying data. Snowflake's architecture separates storage and compute, enabling independent scaling and making it a data warehouse as a service (DWaaS).
- What language does Snowflake use?
Snowflake uses standard SQL (Structured Query Language) for querying data. It supports ANSI SQL and provides extensions for working with semi-structured data like JSON.

Author
Popular Articles


